Thin hair can be a real pain. If you’re like many women, you probably wish for more volume. Maybe you’ve even searched online for things like “hair extensions for thin hair” or “hair extensions for thinning hair,” wondering if they could help. You’re definitely not the only one thinking about this. The good news is, hair extensions really can be a great solution. They can give you the fuller hair you’ve been wanting and a real boost in how you feel about yourself.
This guide from SmartDealBlog.com is all about hair extensions, specifically if you have thin hair. We’ll walk you through everything you need to know, from the different types of extensions out there to how to put them in and take care of them. We want to help you figure out what’s going to work best for you, so you can feel great and confident about your hair again. Think of this as your go-to guide for getting the volume you’ve always wanted if you have thin hair.
Imagine your hair looking totally transformed. Imagine feeling more beautiful and self-assured. Hair extensions can really make that happen, both in how you look and how you feel inside.
This is about more than just hair, really. It’s about expressing yourself and feeling good in your own skin. There are definitely hair styling solutions out there that can make a big difference. Let’s dive in and find the best ones for you.

Finding the Right Hair Extensions for Thin Hair: Clip-ins, Tape-ins, and More
Choosing the right kind of hair extensions is a big first step. What works best really depends on your hair, your lifestyle, and what you’re hoping to achieve. Luckily, there are several types designed for thin hair, each with its own pros and cons. The ideal extensions for you will be the ones that best match your personal needs and what you’re looking for.
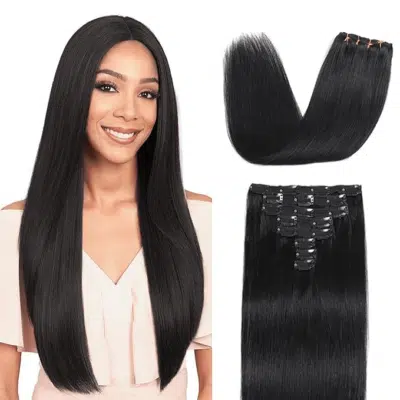
Clip-in Hair Extensions:
Clip-in hair extensions are super popular, especially if you want something temporary. They’re really easy to use – you just clip them into your natural hair. They’re a great choice if you want to change up your look quickly and easily. Because they’re so easy to take out, clip-ins work well for fine hair.
- Pros: Super easy to put in and take out yourself. No long-term commitment. Usually pretty affordable. You can try out different styles without making a big change. And they won’t damage your natural hair.
- Cons: Might not feel as secure as more permanent options. You might need to practice a bit to get them to blend in perfectly.
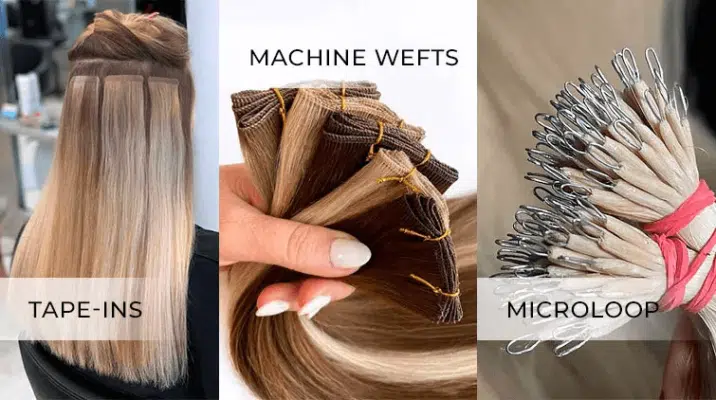
Tape-in Hair Extensions:
Tape-in extensions are attached to your hair using special adhesive tape. Usually, a stylist puts these in for you. They’re a bit more of a commitment but give you a more lasting result. They lie flat against your head, so they tend to look very natural, which is great for thin hair.
- Pros: Look very natural. Feel light and comfortable. You can wear them for several weeks at a time. Good for wearing every day. They blend really well with thin hair.
- Cons: You’ll need to go to a salon to get them put in. They can be pricier than clip-ins. And you’ll need to go back to a salon to get them removed. Some people worry about how to hide the tapes if they have thin hair.
Halo Hair Extensions:
Halo extensions are a newer type. They’re also temporary. They’re basically a strand of hair attached to a wire or band that you place around your head. They’re really easy to put in and are great for adding volume quickly.
- Pros: Incredibly easy to use. No clips or tape needed. Won’t cause damage. Comfortable to wear. Perfect for adding volume all over. Quick to put on and take off.
- Cons: Might not feel as secure as other types. Might not work with every hairstyle. Can sometimes slip out of place. Might not blend quite as seamlessly as tape-ins for certain hairstyles.
Other Types to Think About:
- Fusion or Keratin Bond Extensions: These are attached strand by strand using keratin bonds. They last a long time, but they take a while to put in and need professional removal. They can also be a bit harder on your hair if not done or removed properly.
- Sew-in Weaves: With these, your natural hair is braided first, and then the extensions are sewn onto the braids. They’re secure and last a while. You’ll need a stylist for these, and they can sometimes feel heavy, which isn’t ideal for thin hair.
- Micro-Link Extensions: These use tiny beads to attach extensions to small sections of your hair. No heat or glue is used. They can take a long time to install and might slip if the beads aren’t tightened regularly.
When you’re making your choice, keep these things in mind:
- Your hair type: If you have fine hair, you’ll want extensions that are super lightweight. If your hair is also thinning, you’ll need to be extra gentle.
- Your lifestyle: Are you very active? Do you want to wear extensions every day, or just now and then?
- Your budget: Extension prices can vary a lot. If you’re looking for affordable options for very thin hair, clip-ins and some synthetic extensions are worth considering.
- What you want to achieve: Are you just after a temporary volume boost? Or are you looking for a more permanent way to make your hair look thicker?
When you’re searching online, try using phrases like “best clip in extensions for fine thin hair” or “lightest weight hair extensions for thin hair.” This can help you narrow down your search and find options that are really designed for your hair type.
By the way, YGWigs.com has a fantastic selection of hair extensions for thin hair. They have everything from clip-ins to tape-ins and more, with a focus on good quality. Check out their collection to see what they offer – you might just find your perfect match! They have tons of styles and colors to choose from to really enhance your hair.
Why Hair Extensions Are Great for Thin Hair: More Volume, Natural Look
Hair extensions can be a real game-changer if you have thin hair. They’re fantastic for adding volume and giving you a natural-looking boost. It’s not just about having more hair; it’s about upgrading your entire style and feeling better about how you look. If you’re dealing with thinning hair, extensions can really help you regain confidence.
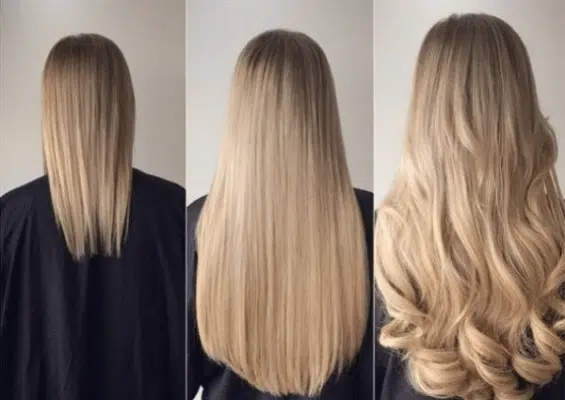
Instantly More Volume: The most obvious perk is definitely the volume. Hair extensions instantly make your hair look thicker and fuller. They’re like volumizing hair pieces that actually work! This is a huge plus if you feel like your hair is lacking body.
Think of your hair going from flat to fabulous. That’s the kind of volume boost we’re talking about. More volume means you can do so much more with your hair.
Looks Just Like Your Own Hair: Today’s hair extensions are made to blend in perfectly. They come in all sorts of textures and colors to match your natural hair. The goal is a really natural look, even if you have very thin hair. With good quality extensions and proper application, it’s totally achievable. A seamless blend is what makes it look real.
Style Versatility: Extensions open up a whole world of styling possibilities. Want long hair? No problem. Layers? Easy. Waves or curls? Go for it. If you have short, thin hair, extensions can add both length and volume. You can really play around with different hair styling solutions and get creative.
Confidence Booster: Having fuller, thicker hair can seriously boost your confidence. It can make you feel more attractive and self-assured. Hair extensions for thin hair can be a real confidence boost. When you feel good about your hair, it affects how you feel all day long. The link between confidence, self-esteem, and how you feel about your hair is strong.
Protect Your Natural Hair: Believe it or not, some types of hair extensions can actually protect your own hair. They act as a shield against heat styling and damage from the environment. This can be a great bonus, especially if you’re concerned about your hair’s health.
Targeted Solutions for Thinning Areas: Hair extensions are great because they can address specific areas where your hair might be thinner:
- If you have thin hair on top or a thinning crown, there are extensions designed just for that.
- Extensions can also help with thinning hairlines and create a fuller look at the front of your hair.
- For those experiencing hair loss, extensions can provide coverage and volume where you need it most, even helping with balding crowns or filling in thinning sides.
The Emotional Benefits: Don’t underestimate how much better you might feel emotionally. Many women find that extensions make them feel less self-conscious and more comfortable in their own skin. It’s a real improvement to their everyday lives.
Hair enhancement through extensions can really transform not just your appearance, but also how you feel about yourself. Hair accessories like extensions are powerful tools for boosting self-image.
How to Put in Hair Extensions for Thin Hair for a Natural Look
Getting hair extensions to look natural is all about putting them in correctly. You want that seamless blend and a totally natural look. How you apply them depends on the type you choose. Here are step-by-step guides for some of the most common types, so you can get a comfortable and natural result. Proper application is key to making them look great.
Putting in Clip-in Hair Extensions:
- Step 1: Get Your Hair Ready: Start with clean, dry hair that’s free of tangles. A little texturizing spray at the roots can help give the clips something to grip onto.
- Step 2: Section Your Hair: Divide your hair into sections horizontally, starting at the back of your neck. Clip the hair above up and out of the way. This gives you a clear area to work with.
- Step 3: Attach the First Piece: Open the clips on your first weft of extensions. Position it close to your scalp and snap the clips shut to secure it. Make sure the clips are lying flat against your head. Start with smaller pieces at the nape of your neck.
- Step 4: Layer as You Go Up: Let down another section of your natural hair. Put in the next weft of extensions a little higher up than the first one. Keep layering upwards, using wider pieces for the middle and back of your head.
- Step 5: Blend the Sides: Use smaller pieces around your temples and the sides of your head, blending them into your natural hairline. Be careful not to place them too close to your face.
- Step 6: Style and Check: Once all the pieces are in, use a brush or comb to blend your natural hair with the extensions. Style your hair as you normally would. Check in the mirror to make sure no clips are visible and adjust if needed. You might want to trim the extensions to match your hair length perfectly.
Putting in Tape-in Hair Extensions :
- Step 1: Prep Your Hair: Start with clean hair, but skip the conditioner and styling products. Your stylist will likely use a special shampoo to make sure your hair is totally clean and dry.
- Step 2: Sectioning: Your stylist will carefully section your hair into thin, horizontal lines.
- Step 3: Applying the Tape-ins: The stylist will peel off the backing from the tape on the extension weft. They’ll place one weft underneath a thin section of your own hair, right near the scalp. Then, they’ll put another weft on top, “sandwiching” your natural hair in between.
- Step 4: Secure the Bonds: Using special pliers, the stylist will gently press the tape bonds together to make sure they’re firmly attached.
- Step 5: Repeat and Blend: They’ll keep going, section by section, working their way up your head and carefully blending the extensions as they go for a natural look.
- Step 6: Cut and Style: To finish, the stylist might trim the extensions so they blend seamlessly with your natural hair. Then, they’ll style your hair.
Putting in Halo Hair Extensions:
- Step 1: Style Your Hair: Brush your hair to get rid of any tangles. Style your natural hair however you want to wear it. You might want to leave a little hair out around your face to blend with the halo.
- Step 2: Position the Halo: Place the halo wire or band on your head like a headband, sitting an inch or two back from your front hairline. It should feel comfortable and secure.
- Step 3: Adjust if Needed: If your halo has an adjustable wire, adjust it to fit the shape of your head. It should be snug but not too tight.
- Step 4: Blend Your Hair Over: Use a comb or your fingers to pull your natural hair up and over the halo band, hiding it completely.
- Step 5: Style and Finish: Style your hair as you like. Hairspray can help keep everything in place. Check in the mirror to make sure it all looks natural.
Tips for a Seamless Look:
- Match Your Color: Get extensions that are an exact match to your hair color. For a perfect match, you might even consider custom color blending.
- Think Lightweight: For thin hair, lightweight extensions are a must. The lightest weight extensions for thin hair will put the least amount of stress on your scalp.
- Hide the Scalp: Position the extensions carefully so they cover your scalp where needed. Look for extensions designed to minimize scalp visibility.
- Practice Makes Perfect: If you’re using clip-ins, practice putting them in a few times. It gets easier each time, and you’ll get faster at it.
- Get Professional Help: For tape-ins and other semi-permanent types, it’s really best to have them applied by a professional stylist. You can find hair extension technicians at salons near you.
By following these detailed steps, you’ll be well on your way to achieving a natural look with hair extensions. Take your time, be patient, and enjoy the transformation!
See Also:
- Colored Hair Extensions: Your Ultimate Guide to Vibrant, Temporary Hair Color
- Ponytail Hair Extensions: Your Ultimate Guide to Instant Volume and Length
Taking Care of Your Hair Extensions: Keep the Volume and Hair Healthy
To keep your hair extensions looking great, you need to take good care of them. This is key to maintaining volume and keeping both your extensions and your natural hair healthy. Proper maintenance will make your extensions last longer and keep your hair looking its best. Maintenance is essential for long-lasting beauty.
Washing and Conditioning Your Extensions:
- Wash Less Often: Try to wash your hair only 2 or 3 times a week. Washing too often can dry out the extensions and loosen the attachments.
- Sulfate-Free Products: Use shampoos and conditioners that are sulfate-free. Sulfates can strip moisture and damage your extensions. Hair products specifically for extensions are usually a good choice.
- Wash Gently: When you wash, do it gently in a downward motion. Avoid rough rubbing, which can cause tangles. Focus shampoo on your scalp and conditioner on the middle and ends of the extensions, avoiding the attachment points.
- Detangle First: Before you wash, gently brush through your extensions to remove any tangles. Use a wide-tooth comb or a special extension brush, starting from the ends and working your way up.
- Air Dry or Low Heat: Air drying is the best way to dry your extensions. If you use a blow dryer, use a low heat setting and always apply a heat protectant spray first. High heat can damage them.
Brushing and Styling Tips:
- Use the Right Brush: A loop brush or wide-tooth comb is ideal for extensions. They’re designed to glide through without snagging or pulling.
- Brush Regularly and Gently: Brush your extensions at least twice a day. Hold near the roots or attachment points as you brush to avoid pulling. Brush from the ends upwards.
- Go Easy on Heat Styling: Try to minimize heat styling tools like curling irons and straighteners. If you do use heat, always use a heat protectant spray. UV protection sprays can also shield against sun damage.
- Extension-Safe Styling Products: Avoid heavy oils, serums, and products with alcohol. These can break down the attachments or make your extensions look greasy. Lightweight extensions need lightweight products.
- Loose Hairstyles: Avoid tight hairstyles that can pull on the extensions. Loose braids, ponytails, and buns are gentler options.
- Braid Before Bed: Before you go to sleep, loosely braid your hair. This helps prevent tangling overnight. Sleeping on a silk or satin pillowcase can also reduce friction and tangles.
Care Tips for Different Extension Types:
- Clip-in Extensions: Take them out before sleeping, showering, or swimming. Store them carefully in a cool, dry place. Wash them separately as needed.
- Tape-in Extensions: Avoid getting oil-based products near the tape attachments. Be gentle when brushing close to your scalp. Schedule salon appointments every 6-8 weeks to have them re-taped and moved up as your natural hair grows.
- Halo Extensions: Remove your halo before sleeping. Store it carefully to prevent tangling. Wash it as needed, following the gentle washing instructions.
General Maintenance Advice:
- Regular Salon Visits: Keep up with regular appointments with your stylist. They can check your extensions, tighten any loose attachments, and trim them to keep their shape. Salons that specialize in extensions will offer these services.
- Professional Removal: Always have your extensions removed by a professional. Trying to take them out yourself can damage your natural hair. Damage-free extensions depend on proper removal.
- Keep Them Hydrated: Use a deep conditioner or hair mask regularly to keep your extensions moisturized and soft. Hair thickening solutions often include moisturizing treatments.
- Avoid Chlorine: Chlorine and saltwater can damage extensions. If you swim, wear a swim cap or try to keep your hair dry.
- Maintain Hair Density: Taking good care of your extensions helps maintain their hair density, keeping them looking full and healthy for longer.
By following these hair care for thinning hair tips, you can keep your hair extensions for thin hair looking beautiful and lasting as long as possible. Consistent care is the key to enjoying your added volume and style.
How to Choose the Best Hair Extensions for Your Thin Hair
Choosing the best hair extensions really comes down to thinking about a few key things: weight, material, and how they attach to your hair. These factors will affect how comfortable they feel, how natural they look, and how long they last. Finding the right combination is what will make you truly happy with your choice.
Weight of the Extensions:
- Lightweight is Key: If you have thin hair, lightweight extensions are a must-have. Heavy extensions can pull on your delicate hair, leading to breakage and just feeling uncomfortable. The lightest weight hair extensions for thin hair are always the best choice.
- Check the Gram Weight: Pay attention to how much the extensions weigh in grams. Lower gram weights mean lighter extensions, which are better for fine hair.
- Consider Ultra-lightweight: Look into ultra-lightweight hair extensions. They’re designed to be super comfortable and put very little stress on thin hair. You’ll barely feel them.
- Match Your Hair’s Thickness: Choose extensions that are about the same thickness as your natural hair. Extensions that are too thick can look unnatural and bulky on thin hair.
Material of the Extensions:
- Human Hair Extensions: Human hair is usually the best material. It looks and feels the most natural, and you can style it with heat, wash it, and treat it just like your own hair. Human hair extensions often look best on fine hair.
- Remy Human Hair: Remy hair is a type of high-quality human hair where all the strands are aligned in the same direction. This helps prevent tangling and makes the extensions last longer.
- Synthetic Extensions: Synthetic extensions are less expensive than human hair, but they’re also less versatile. You can’t use heat on them, and they might not look quite as natural. They also don’t last as long. But they can be a good budget option for occasional wear.
- Heat-Resistant Synthetic: Some synthetic extensions are made to withstand low heat styling. If you’re considering synthetic, check if they are heat-resistant.
Attachment Method for Thin Hair:
- Clip-in Extensions: Clip-in extensions are a great place to start, especially if you have thin hair. They’re temporary and easy to take out. Choose clip-ins with small, flat clips that sit close to your head. Hair extension clips for thin hair should be gentle but secure, and hair extension clips for fine hair need to be lightweight.
- Tape-in Extensions: Tape-in extensions are a popular semi-permanent option for thin hair. They’re lightweight and lie flat against your scalp, and the tape attachments are fairly discreet. It’s important to have them put in and taken out by a professional. Good tape-ins, when applied well, are easier to hide even if you have thin hair.
- Halo Extensions: Halo extensions are very gentle on thin hair because they don’t use clips or tape. The wire or band distributes the weight evenly. Plus, they’re easy to put in and take out yourself.
- Micro-Link/Bead Extensions: These can work if they’re put in carefully by someone experienced. The beads should be tiny and light, and only very small sections of your own hair should be used to avoid pulling.
- Avoid Heavy Methods: Sew-in weaves and fusion extensions are often too heavy and can damage thin hair. It’s generally best to avoid these methods. Glue-in hair extensions are also usually too harsh for delicate hair.
Other Things to Consider:
- Hair Length: Don’t choose extensions that are much longer than your natural hair. Too much extra length can make thin hair look even thinner at the roots. If you have short, thin hair, be careful about choosing extensions that blend well in length and style.
- Color Match: Get a perfect color match. Custom color blending can help create a seamless look. You might want to get professional help with color matching.
- Brand Reputation: Look into different hair extension brands. Choose brands that are known for quality and for making extensions specifically for fine hair. Luxy fill in hair extensions are one brand known for lighter options.
- Read Reviews: See what other people with thin hair are saying in reviews. Their experiences can be really helpful.
Finding Hair Extensions Near You:
- Search for “hair extensions for thin hair near me” or “hair extensions for thinning hair near me” to find salons and stylists in your area who specialize in extensions for thin hair.
- If you’re dealing with hair loss due to alopecia, search for “hair extensions for alopecia near me.”
YGWigs.com – Your Go-To for Thin Hair Extensions:
YGWigs.com really focuses on hair extensions that are perfect for thin hair. They have a great selection of lightweight options, including clip-ins for fine hair and tape-ins. You’ll find different lengths, colors, and materials, including high-quality human hair. YGWigs.com is all about helping women with thin hair get more volume and feel confident. Check out their collection today and find the ideal hair extensions for very fine thin hair! Your dream hair could be waiting for you at YGWigs.com!
Addressing Your Worries About Hair Extensions for Thin Hair
It’s normal to have some worries about hair extensions, especially if you have thin hair. People often wonder about damage, whether you’ll be able to see the attachments, and how much work they are to maintain. Let’s tackle these common concerns and give you some realistic answers.
Worry: Will Extensions Damage My Natural Hair?
- The Fear: Lots of people are afraid that hair extensions will damage their already thin hair, making it break or even fall out.
- The Reality: When you choose the right type of extensions and put them in correctly, they shouldn’t cause serious damage. The secret is to go for lightweight options and use gentle application methods. Damage-free extensions are possible if you’re careful about your choices and how you care for them.
- Solutions:
- Choose Light Options: Clip-ins, halo extensions, or lightweight tape-ins are your best bets. Stay away from heavy or bulky types. Look for the lightest weight hair extensions for thin hair.
- Apply Them Properly: Make sure extensions are applied correctly. For tape-ins and other semi-permanent types, it’s really best to get them professionally installed.
- Remove Them Gently: Always have extensions removed by a professional. Never try to pull them out yourself. Damage-free extensions also depend on proper removal.
- Good Hair Care Routine: Take good care of your scalp and natural hair. Use gentle, moisturizing products and keep your hair healthy.
- Avoid Tension: Don’t wear tight hairstyles when you have extensions in. Give your scalp and hair regular breaks from extensions.
- Medical Grade Adhesives: If you have a sensitive scalp, some tape-in extensions use medical-grade adhesives that are less likely to cause irritation.
Worry: Will You Be Able to See the Attachments?
- The Fear: If you have thin hair, you might worry that the parts where the extensions are attached will be visible, especially at your roots or where you part your hair.
- The Reality: You can definitely minimize how visible the attachments are by choosing the right extensions and using good application techniques. There are even extensions designed to have minimal scalp visibility.
- Solutions:
- Go for Thin Wefts: Choose extensions with thin pieces that lie flat against your head.
- Place Them Strategically: Put the extensions where they’ll do the most good to cover any sparse areas. If you have thin hair on top or a thinning crown, focus on adding volume there. For thinning hairlines, you need to make sure the extensions blend in seamlessly at the front.
- Match Your Root Color: Choose extensions that are a close match to the color of your hair at the roots. This helps hide the attachments.
- Smart Styling: Style your hair in ways that help conceal the attachments. Styles with a bit of texture or a side part can be more effective than straight, sleek styles with a middle part.
- Camouflage Products: Use root concealer sprays or powders to blend the attachments in even more with your scalp color.
Worry: Are Extensions Hard to Take Care Of?
- The Fear: You might be concerned that hair extensions will be a lot of work to maintain. People wonder about how much time it will take to put them in and the daily upkeep.
- The Reality: Yes, extensions do require some maintenance, but it doesn’t have to be too much. How much work is involved depends on the type of extension you choose. Clip-ins are the easiest to care for, while tape-ins need more regular salon visits.
- Solutions:
- Choose Based on Your Lifestyle: If you want the least amount of maintenance, clip-ins or halo extensions are good choices. If you prefer longer-lasting volume and are okay with some upkeep, tape-ins might work for you.
- Set Up a Hair Care Routine: Follow a consistent routine for washing, conditioning, and brushing your extensions, as we talked about earlier.
- Regular Salon Visits: For tape-ins and other semi-permanent types, make sure to go to your salon for regular check-ups. This helps keep them in good shape and ensures they’re moved up properly as your hair grows.
- Think About Durability: Choose good quality extensions that are made to last. Taking good care of them will also help them last longer.
Worry: How Much Will Extensions Cost?
- The Fear: Hair extensions can be pricey. You might be worried about the initial cost and the ongoing expenses for maintenance. Many people look for affordable hair extensions for very thin hair.
- The Reality: The cost of hair extensions can vary a lot depending on the type, material, length, and brand. Clip-ins are generally the most affordable. Human hair extensions cost more than synthetic ones. And salon application and maintenance will add to the overall price.
- Solutions:
- Set a Budget: Decide how much you’re willing to spend before you start shopping.
- Explore Different Options: Compare prices for different types and brands. Clip-in extensions are a less expensive way to try out extensions.
- Consider Synthetic Blends: Synthetic blends can be a more budget-friendly option while still looking pretty natural.
- Invest in Quality: While price is important, spending a bit more on higher-quality extensions can be more economical in the long run. They’ll last longer and look better, which can be worth the investment.
- Look for Deals: Keep an eye out for sales and special offers from hair extension brands and salons.
By addressing these common worries, you can feel more confident about trying hair extensions for thin hair. Remember, with the right extensions, good application, and proper care, you really can get the volume boost and confidence you’re looking for. Hair extensions can be a fantastic solution.